TLDR: Kubenurse is the Swiss army knife for Kubernetes network monitoring. It will help you
- pinpoint bottlenecks and know the latency in your network
- identify nodes with network issues (packet drops, slow connection, etc.)
- uncover issues like DNS failures, broken sockets, or interrupted TLS negotiations
Description
Kubenurse is a Kubernetes network monitoring tool developed and open-sourced by PostFinance (a Swiss Banking Institution), which acts like an in-cluster doctor, continuously checking the health of your pod-to-pod, pod-to-service, and pod-to-ingress connections.
It is a small Go application that runs as a DaemonSet on every node in
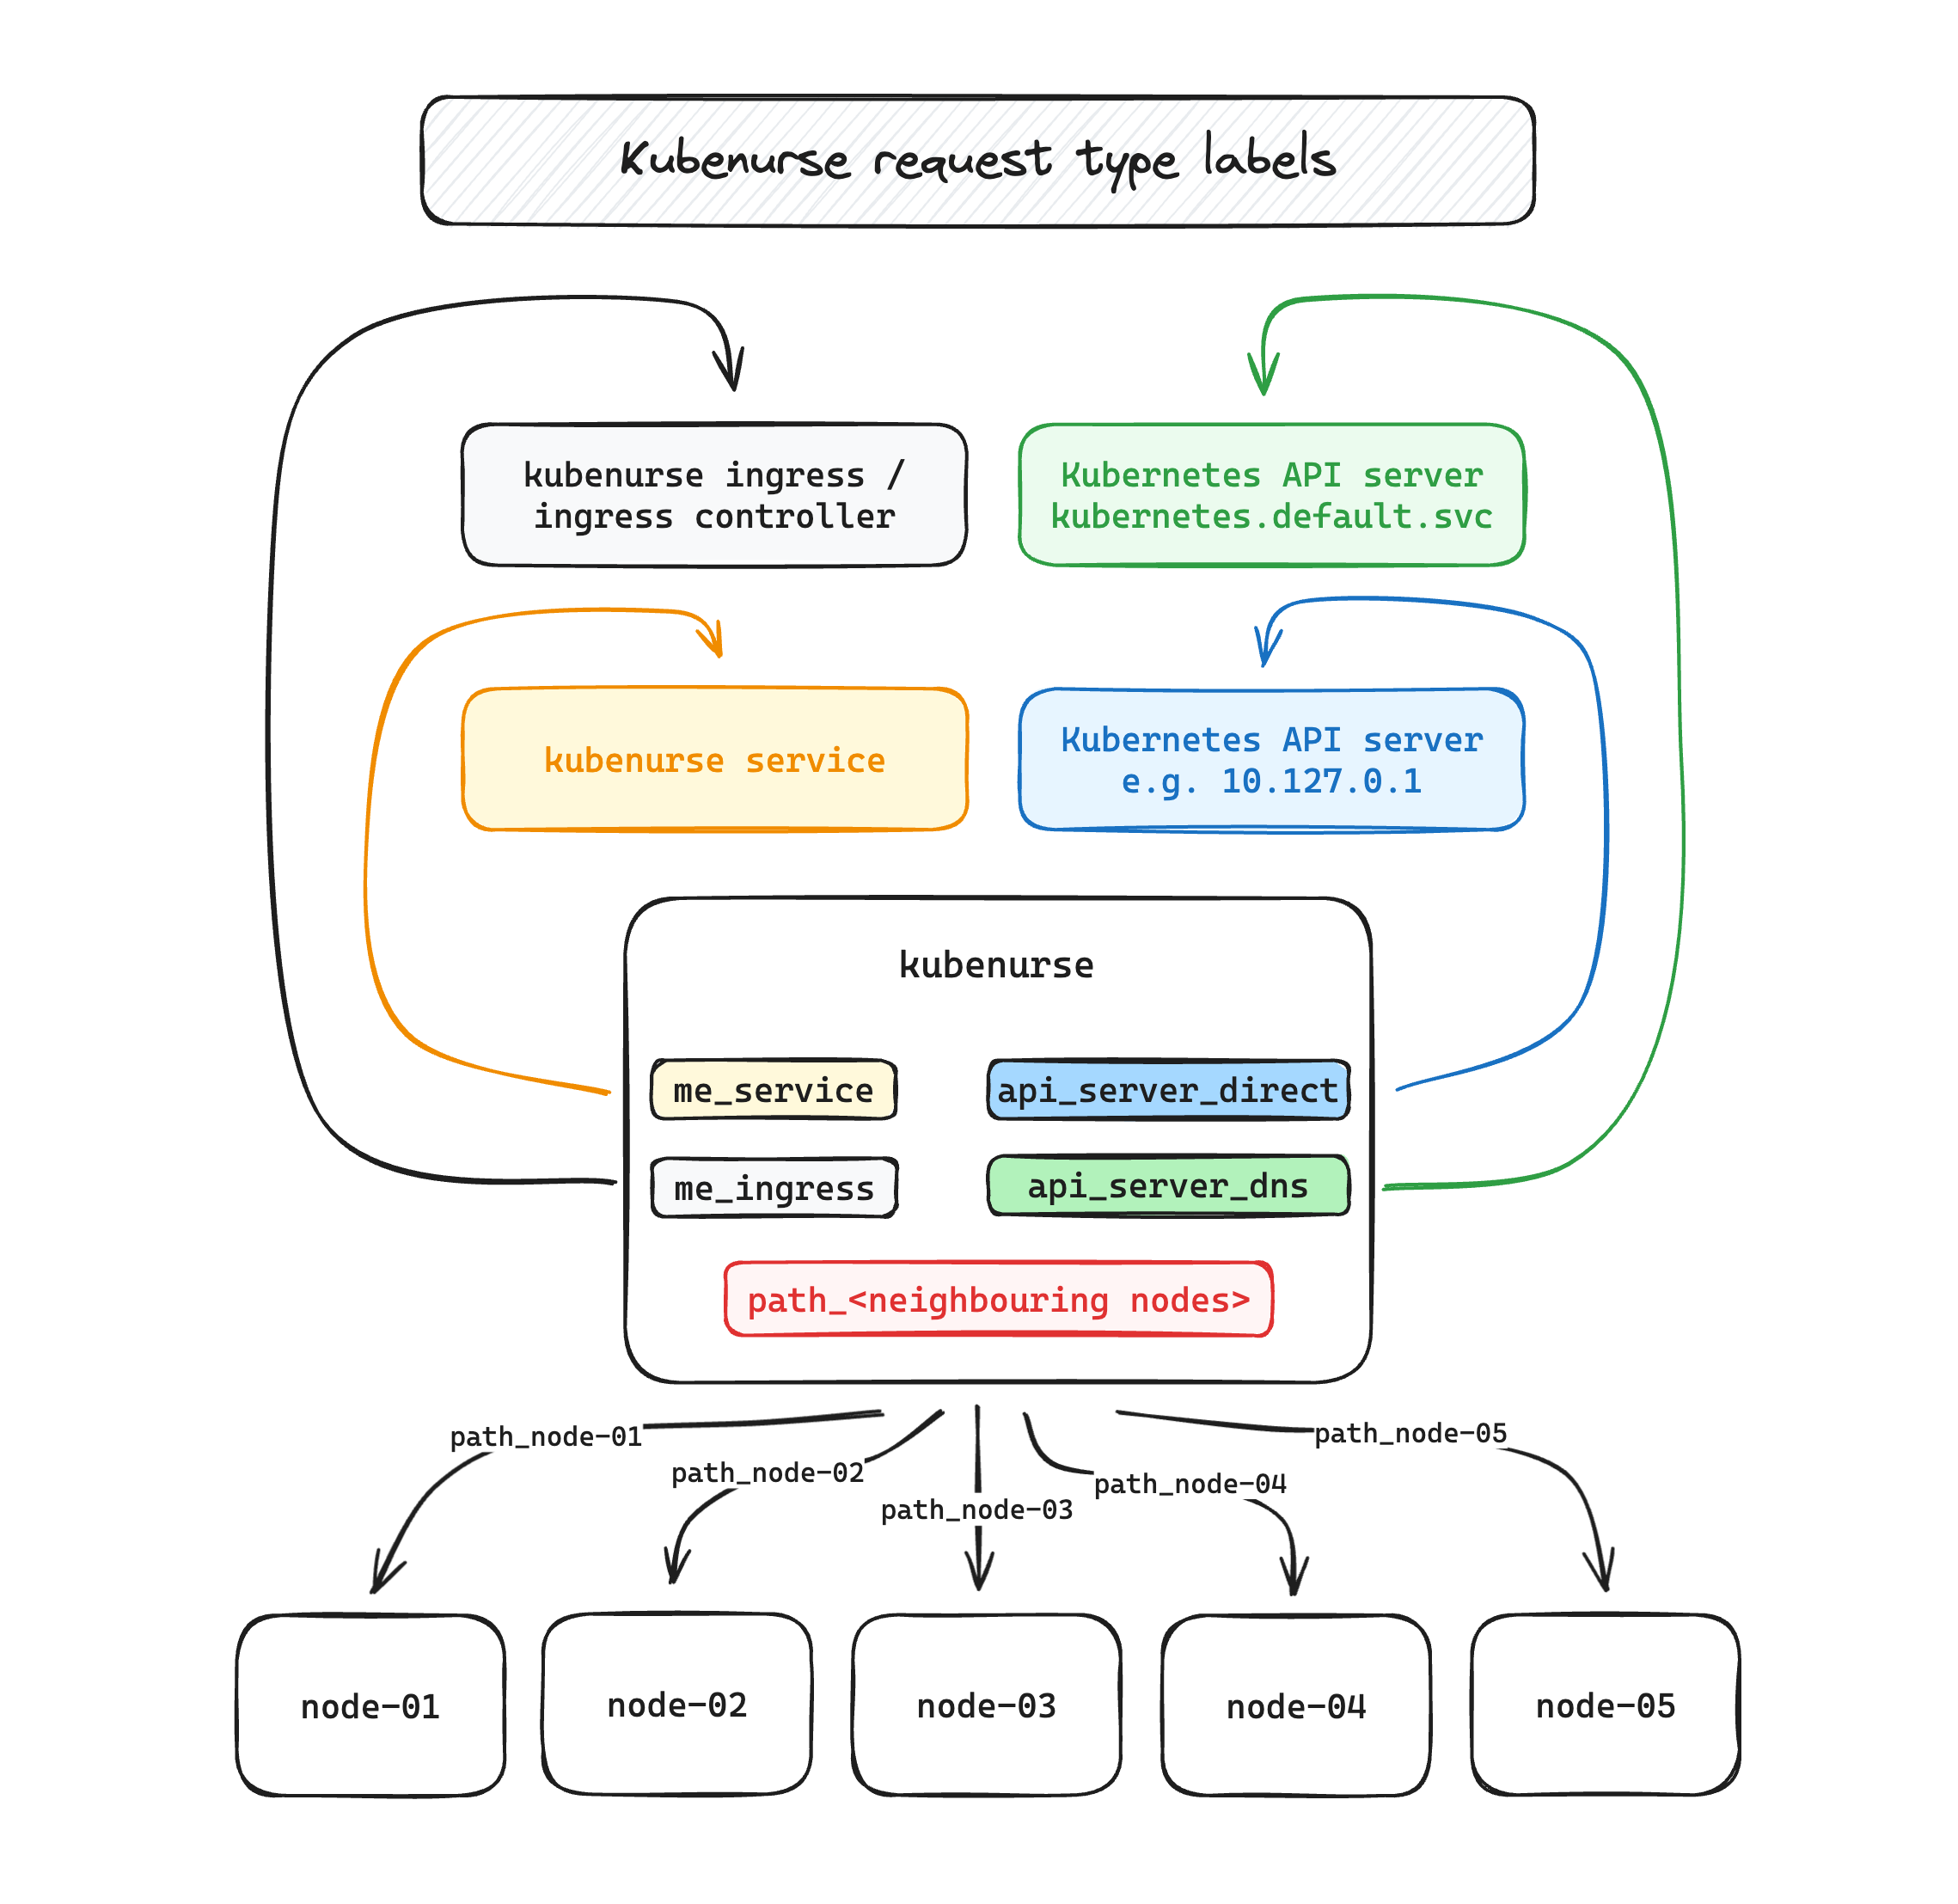
your cluster, and which continously performs requests against the following
endpoints:
- kubenurse ingress endpoint itself, typically
https://kubenurse.your-cluster-ingress.yourdomain.tld
→ this endpoint lets us know about the end-to-end latency, and also permits to detect ingress controller problems - kubenurse service endpoint, i.e.
kubenurse.kubenurse.svc.cluster.local:8080
→ monitoring the service will be helpful in appreciating in-cluster network latency - Kubernetes API server / DNS, through its DNS name,
kubernetes.default.svc.cluster.local
→ this endpoint captures both the K8s apiserver latency, as well as the DNS resolution inside the cluster. - Kubernetes API server / IP, through the direct endpoint, e.g.
10.127.0.1
→ same as above, but bypassing DNS resolution. Interesting and helpful in conjunction with the above to quickly identify DNS lookup errors/slowness - neighbouring kubenurse pods, e.g. towards
node-02,node-03, …
→ especially helpful in diagnosing a neighbour with an erratic network connection.
It then collects error counters and detailed latency histograms, which can be
used for alerting and visualization. All the collected metrics are partitioned
with a type label, as can be seen in this
excalidraw.com drawing which illustrates the
different request types.
Metrics
For each request type, instrumentation functions around Golang’s http client
record information such as the overall latency of the request, the fact that an
error occurred during the request, and detailed information (time for DNS
lookup, time for TLS establishment, etc.) thanks to instrumentation with Go
http/httptrace package.
All this data is then available at the /metrics endpoint, and the following
metrics are exposed.
| metric name | labels | description |
|---|---|---|
kubenurse httpclient request duration seconds |
type |
latency histogram for request duration, partitioned by request type |
kubenurse httpclient trace request duration seconds |
type, event |
latency histogram for httpclient trace metric instrumentation, partitioned by request type and httptrace connection events |
kubenurse httpclient requests total |
type, code, method |
counter for the total number of http requests, partitioned by HTTP code, method, and request type |
kubenurse errors total |
type, event |
error counter, partitioned by httptrace event and request type |
kubenurse neighbourhood incoming checks |
n\a | gauge which reports how many unique neighbours have queried the current pod in the last minute |
For metrics partitioned with a type label, it is possible to precisely know
which request type increased an error counter, or to compare the latencies of
multiple request types, for example compare how your service and ingress
latencies differ.
The event label takes value in e.g. dns_start, got_conn,
tls_handshake_done, and more. the detailed label values can be seen in the
httptrace.go
file.
Getting started
Installing Kubenurse is a child’s play with the provided Helm chart:
helm upgrade kubenurse --install \
  --repo=https://postfinance.github.io/kubenurse/ kubenurse \
  --set=ingress.url="kubenurse.yourdomain.tld"
Running that command should get you started, but you most likely need to double-check your logs to make sure that you don’t have any errors.
For the detailed configuration option, check the Helm parameters collapsible section of the README, or the environment variable part if you prefer to deploy with raw manifests.
Grafana
Once everything is running and metrics are properly collected, you can import the example Grafana dashboard to start visualizing the metrics:

Neighbourhood check
Note
This chapter is rather technical, you can skip to the conclusion if you are not interested in knowing how hashing is used to randomly distribute the neighbourhood checks.
As documented above, kubenurse conducts a series of path_<neighbour-node-xx>
checks against schedulable (i.e. non-cordoned) nodes, which permit to quickly
identify nodes with latency issues or connectivity problems.
Neighbourhood filtering
While the neighbourhood check is really useful, without filtering, the number
of requests for the neighbourhood check in a cluster with \( n \) nodes was
growing as \( O(n^2) \), which rendered kubenurse impractical on large
clusters, as documented in issue
#55.
To solve this issue, I recently implemented a node filtering feature, which works as follows
- Kubenurse computes its own node name checksum:
currentNodeHash - it then computes the
sha256checksums for all neighbours’ node names, and it computesh := otherNodeHash - currentNodeHash - it puts the subtracted hash
hin a size 10 max-heap, thereby keeping only the next 10 nodes to query.
If you want to take a look at the implementation for the node filtering, follow over here.
To make it more visual, here is an interactive visualization where you can play with the number of nodes and neighbours. Feel free to adjust the sliders and click on a node to see which neighbours it queries. Toggle between hash order and linear order, or compare the filtered O(n) approach against the unfiltered O(n²) one to appreciate the reduction in total checks.
Note
This interactive visualization was added to the article in July 2026, ported from my KubeCon EU 2026 talk.
Thanks to this filtering, every node is making queries to at most 10 nodes (configurable) in its neighbourhood, unless one of the nodes is cordoned or deleted, in which case the following node in the list is picked.
This filtering introduces many benefits:
- because of the way we first hash the node names, the checks are randomly distributed, independant of the node names. if we only picked the 10 next nodes in a sorted list of the node names, then we might have biased the results in environments where node names are sequential
- metrics-wise, a
kubenursepod should typically only have histogram entries for ca. 10 other neighbouring nodes worth of checks, which greatly reduces the load on your monitoring infrastructure - because we use a deterministic algorithm to choose which nodes to query, the metrics churn rate stays minimal. (to the contrary, if we randomly picked 10 nodes for every check, then in the end there would be one prometheus bucket for every node on the cluster, which would put useless load on the monitoring infrastructure)
Per default, the neighbourhood filtering is set to 10 nodes, which means that on cluster with more than 10 nodes, each kubenurse will query exactly 10 nodes, as described above.
Conclusion
Kubenurse is a lightweight, easy-to-use, and powerful Kubernetes networking monitoring tool that provides millisecond-level latency insights. By using Kubenurse, you can
- troubleshoot network issues faster by pinpointing problems like ingress errors or DNS issues.
- set meaningul alerts and SLOs for your ingress latency, the apiserver latency, the node-to-node latency, etc.
- quickly identify broken nodes with flappy network links thanks to neighborhood checks.
Finally, PRs and issues are open, feel free to contribute or ask if something is unclear or could be improved, I’ll be happy to work on it :)